
A paver patio that looked tight and level on installation day can start to gap, rock or sink a season or two later. The pavers themselves are almost never the problem — solid concrete units do not compress or rot. What moves is everything underneath and around them: the edge restraint that is supposed to hold the field together, the sand that beds and joints the pavers, and the drainage path water takes once it reaches the patio. Here is what the Interlocking Concrete Pavement Institute’s own construction standards say causes each of those three failure points, and what a correct installation looks like instead.
- 1Missing or undersized edge restraint is the most common cause. Without one, field pavers spread laterally under normal traffic and freeze-thaw cycling — ICPI Tech Spec 3 calls restraint an essential component, not an optional finishing detail.
- 2Wrong sand or inadequate base compaction is the second cause. Bedding sand has to be concrete sand (ASTM C33) screeded to a nominal 1 inch — stone dust or masonry sand doesn’t compact evenly and blocks drainage — on a base compacted to at least 98% Proctor density.
- 3Joint sand washes out wherever water concentrates — a downspout with no gutter, a slope that channels runoff across the patio — and ICPI says plain sand is not recommended in joints subject to that kind of channelized flow.
- 4A small amount of settling is normal and built into the installation: pavers are typically set 1/8–1/4 inch above final grade on purpose, to compensate for the minor settling every sand-set pavement goes through.
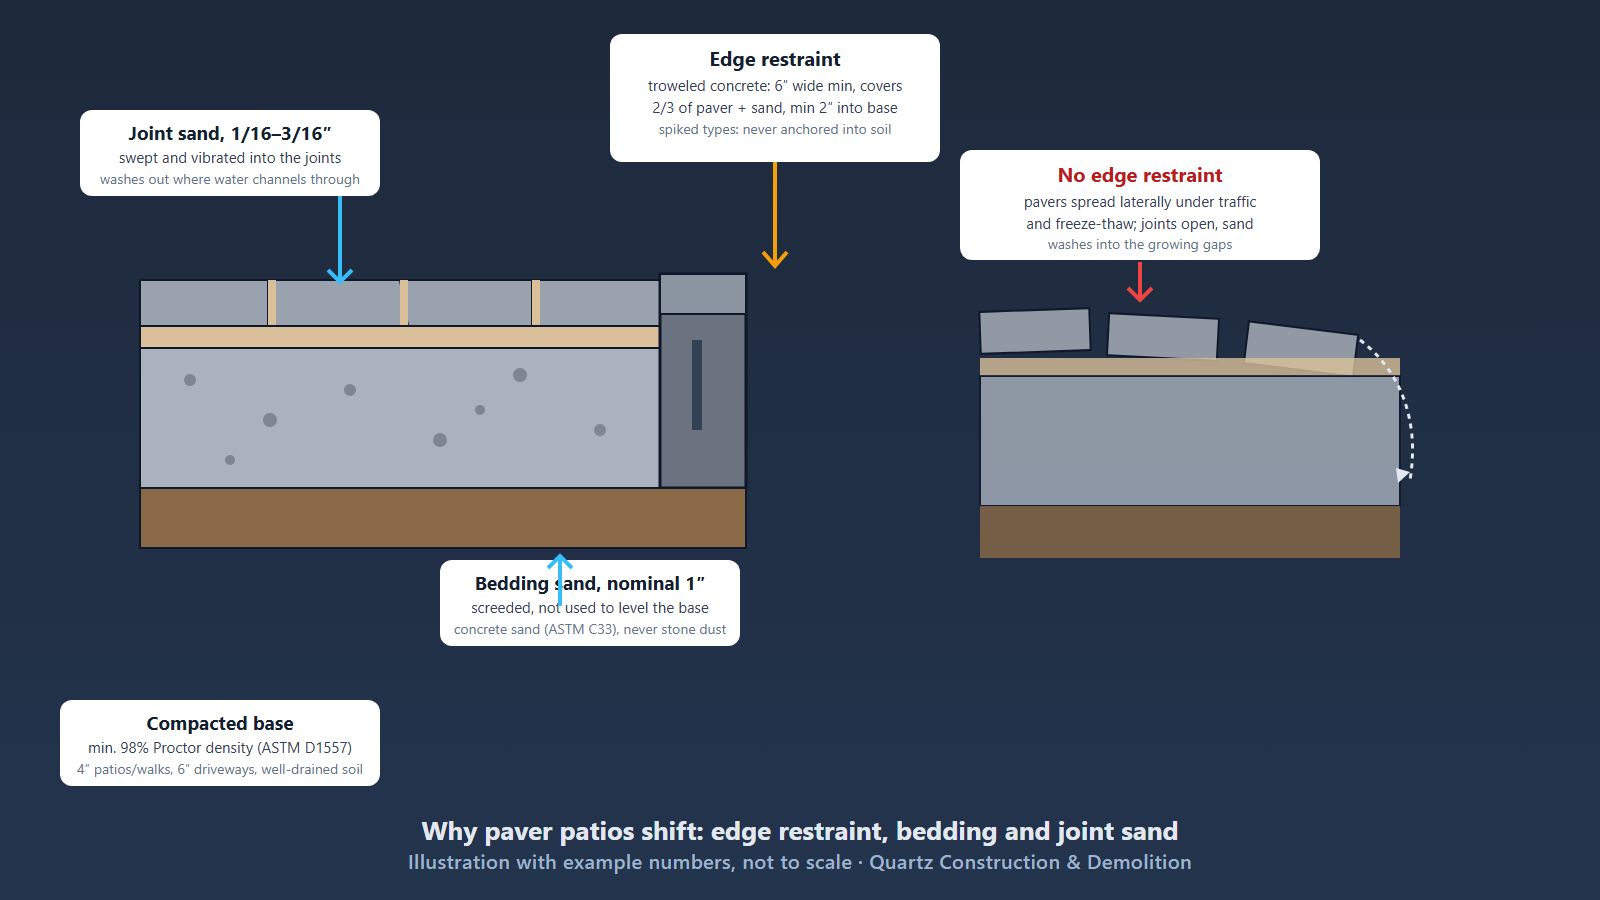
Why a missing edge restraint is usually where it starts
ICPI Tech Spec 3 opens its edge-restraint bulletin with a blunt statement: restraints are an essential component of interlocking concrete pavements, not a cosmetic border. They hold the field of pavers tightly together so the units interlock across the whole pavement and resist the horizontal forces that foot and vehicle traffic push outward with every step or tire pass. Take the restraint away — or install it wrong — and that lateral push has nowhere to go but out, a little more with every freeze-thaw cycle and every season of use.
Two mistakes show up often enough that ICPI calls them out specifically. Soil backfill alone is never a suitable edge restraint — loose dirt packed against the last row of pavers gives way under load instead of holding it. And an edge restraint should never be installed on top of the bedding sand; it has to bear on the compacted base below the sand layer, or it will settle and lose its grip along with everything it was supposed to hold.
Edge restraint doing its job
- Anchored into the compacted base, below the bedding sand
- Sized to the material’s own spec (width, depth, spike penetration)
- Joints stay tight; no visible gap opening between the last paver and the restraint
Edge restraint that will fail
- Set on top of sand, or anchored into loose soil backfill instead of base
- Undersized for the application (a light residential edging under driveway traffic)
- Visible gap at the perimeter where sand is already escaping
What a properly built edge restraint looks like
ICPI Tech Spec 3 gives real dimensions, not just a general principle, for the two restraint types most common on a Bay Area patio. A troweled concrete edge — applied without forms directly against the edge pavers and onto the compacted base — should be at least 6 inches wide and thick enough to cover at least two-thirds of the side of the edge pavers and the bedding sand layer, extending a minimum of 2 inches into the base itself. If the concrete is site-mixed, the aggregate-to-cement ratio should be at least 5 to 1, and compacting the pavers against it has to wait until the concrete has set.
Manufactured restraints — plastic, aluminum or steel edging — follow a different rule: they rely entirely on spikes driven well into the compacted aggregate base, never into the soil beneath or beyond it. As a rule of thumb, the base should extend past the restraint spikes by at least the same distance as the base is thick — a 6-inch base should run at least 6 inches beyond the edge — which gives the restraint something solid to resist against instead of flexing on unsupported ground. Timber edging is not recommended at all; ICPI notes it warps and eventually rots, which is exactly the slow failure that shows up as a wandering, gapping patio edge years after installation.
Base, bedding sand and compaction
Even a correctly built restraint can’t fix pavers that are shifting because of what they are sitting on. ICPI Tech Spec 2 specifies bedding sand that conforms to ASTM C33 or CSA A23.1 — essentially washed, sharp concrete sand — and is explicit that masonry sand, limestone screenings and stone dust should never be substituted, because they do not compact uniformly and can block lateral drainage through the bedding layer. That sand is screeded to a nominal 1 inch and is never used to make up for an uneven base; any unevenness in the base reflects straight through to the surface over time.
The base itself has its own compaction target: a minimum of 98% standard Proctor density for pedestrian areas and residential patios, rising to 98% of modified Proctor density (ASTM D1557) for anything carrying vehicle traffic. Recommended base thickness is at least 4 inches for sidewalks and patios on well-drained soil, and at least 6 inches for residential driveways — with 2 to 4 inches added in continually wet or weak soils. Skip or shortcut that compaction step and the base keeps consolidating under the pavers after installation, which is a slower, patio-wide version of the same settling an edge-restraint failure causes at the perimeter.
Joint sand washout and drainage
Joints between pavers should run a consistent 1/16 to 3/16 inch, filled with dry sand swept and vibrated in with a plate compactor until the joints are full — a process that often takes two or three compaction passes. That sand is doing real structural work: it provides vertical interlock between units and helps transfer loads sideways into neighboring pavers instead of concentrating on one spot.
The problem is water. ICPI is direct about it: sand is not recommended in joints subject to channelized water flow, because it will eventually wash out and weaken the pavement. On a Bay Area patio that usually means one of two things — a roof downspout or eave draining straight onto the paved surface without a gutter, or a patio graded so runoff concentrates along one edge or low corner instead of sheeting off evenly. Where that kind of concentrated flow can’t be redirected, ICPI’s own fix is to dry-mix a small amount of cement into the joint sand (roughly 3 to 4 percent by weight) or use a dedicated joint-sand stabilizer product, both of which resist washout in a way plain sand cannot.
Check where your roofline drains before blaming the pavers. A downspout that was moved, added, or never had a gutter extension can turn one corner of an otherwise well-built patio into a channelized-flow problem the rest of the installation was never designed to handle.
How a shifted edge or joint gets rebuilt
- Step 1Lift the affected paversPull pavers back from the problem area to expose the bedding sand, base and restraint underneath.
- Step 2Diagnose the actual causeCheck whether the restraint is missing, undersized, set on sand instead of base, or anchored into soil — versus a base/bedding sand issue versus a drainage path dumping water into the joints.
- Step 3Rebuild the restraint to specInstall or replace the edge restraint per the dimensions above — anchored into compacted base, not sand or soil.
- Step 4Re-screed bedding sand and reset paversReplace any contaminated or uneven bedding sand, reset the pavers, and compact with a plate compactor to seat them.
- Step 5Refill joints, address the water sourceSweep and compact new joint sand (stabilized if the area sees concentrated runoff), and fix the drainage path that caused the problem in the first place.
How much settling is actually normal
Not every bit of movement is a defect. ICPI Tech Spec 2 notes that installers typically set the finished paver surface 1/8 to 1/4 inch above the final target elevation specifically to compensate for minor settling — stating plainly that “a small amount of settling is typical of all flexible pavements.” Final surface elevations are allowed to vary up to 3/8 inch under a 10-foot straightedge, and joint lines up to 1/2 inch over 50 feet, under ICPI’s own construction tolerances. What is not normal is a widening gap at the perimeter, a corner that keeps sinking after the first season, or joint sand that visibly disappears after every rain — those point to one of the three causes above, not ordinary settling.
Signs it’s a restraint or drainage problem
Work through these before assuming the whole patio needs to be torn out. The checklist works without JavaScript; with it on, your ticks are saved in this browser only.
Paver patio shifting — quick check
Tick each item that applies to your patio.
Questions homeowners ask
Can I just add more joint sand to fix a shifting patio?
Only if the cause is ordinary joint-sand loss with an intact, correctly built edge restraint underneath. If pavers are visibly spreading or a corner is sinking, the restraint or the base is the actual problem, and more joint sand on top will wash out again without addressing it.
Why did sand keep washing out of my joints even though I refilled it?
ICPI specifically advises against plain sand in joints subject to channelized water flow — a downspout or a slope that concentrates runoff across one area. The fix is usually a cement-stabilized joint sand (roughly 3–4% cement by weight) or a joint-sand stabilizer, combined with redirecting the water source.
Is a plastic edge restraint strong enough for a patio?
Plastic edging is acceptable for light-duty residential and commercial paver applications per ICPI Tech Spec 3, as long as it is firmly spiked into the compacted aggregate base — never into soil beyond the base, and never resting on top of the bedding sand.
How much paver movement is considered normal settling?
ICPI’s own construction tolerances allow up to 3/8 inch of surface-elevation variation under a 10-foot straightedge and up to 1/2 inch of joint-line variation over 50 feet, with installers typically setting pavers 1/8–1/4 inch high to begin with to absorb minor settling. A widening perimeter gap or a corner that keeps sinking season after season is outside that normal range.
Patio edges spreading or sinking?
We can diagnose whether it’s the edge restraint, the base and bedding sand, or a drainage path dumping water into the joints — and rebuild only what actually needs it. Quartz Construction & Demolition holds California contractor license #1003436, which you can verify on the CSLB website.
Related services and guides
- ServicePatio pavers
- GuideHow deep should a paver base be in clay soil?
- GuidePaver installation prep checklist
- GuideWet-season grading and erosion control
Sources
Watch Our Work in Action
Watch our project videos on YouTube
Watch on YouTube- Interlocking Concrete Pavement Institute – Tech Spec 2, Construction of Interlocking Concrete Pavements — bedding sand material and thickness (ASTM C33, nominal 1 inch), base compaction (98% standard/modified Proctor, ASTM D1557), base thickness guidance, joint width (1/16–3/16 in.), compactor force (5,000 lbs/75–90 Hz), settling tolerance (1/8–1/4 in.) (checked October 23, 2026, PDF text extracted directly).
- Interlocking Concrete Pavement Institute – Tech Spec 3, Edge Restraints for Interlocking Concrete Pavements — purpose of edge restraints, troweled concrete dimensions (6 in. wide, 2/3 coverage, 2 in. into base), spiked-restraint anchoring rules, soil-backfill and sand-top prohibitions, joint-sand channelized-flow guidance and cement-stabilization ratio (checked October 23, 2026, PDF text extracted directly).
- CSLB Check a License — verify any contractor’s license, including ours (#1003436).
General information, not engineering advice and not a Quartz quote. ICPI Tech Spec bulletins are published as construction guidelines, not an enforceable code or specification — confirm project-specific requirements with your installer or a design professional.
What Our Customers Say
"I had small repair job needed for my mother. They responded quickly and did excellent work and I will definitely use them again."
"I had a great experience working with Ohad and his team on my yard project! From start to finish, the communication..."
"We just finished backyard renovation and pergola project with Quartz Construction and Demolition. From start to finish..."